


Table of contents
- Let's Go!
- Exploring the API with the postman
- Creating the Actions in Redux
- Create Action Creators and, why do we need them?
- Creating Components
- How to Add a Call to the API.
- How to pass the result of the API to the state and create the store.
- How to create a store and make redux dev tools working
- Provide the redux store to React
- Redux devtools in Action!
- How to get the ID of a specific character
- How to Display single character details
- The Final Touch
Hello developers, In the previous blog we learned how to set up a redux store, create reducers and actions, and how to connect react with redux! In this post, we will create a simple fun project using Redux and how to get and store the response of the API inside the store!
Let's Go!
Our App won't be any good if it didn't have any Rick and Morty cartoon characters to display.
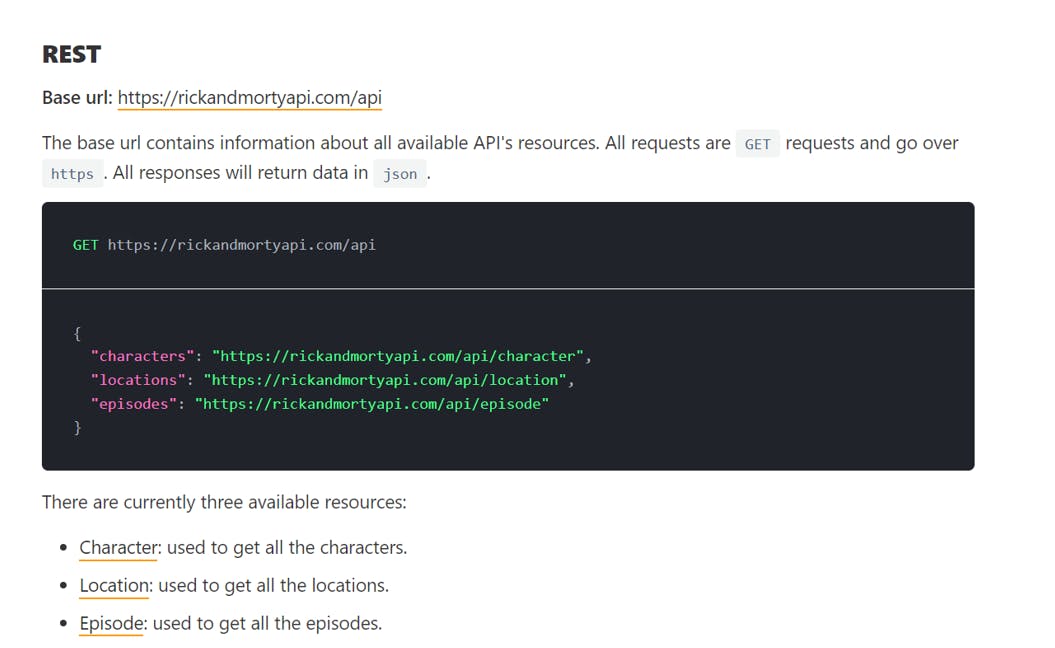
We are going to use the rickandmortyapi.com/documentation API as a source to get the Rick and Morty cartoon characters, this API is free to just go through the documentation page.
Exploring the API with the postman
This step is optional, If you want to see the response you can test the URL on the postman App.
Creating the Actions in Redux
Actions are the constants in redux that tell us what to do, so in our app, we just want to display all the characters with their details and when selected display particular character information.
so in our src folder, we will create a file named Action.js

Inside this file, we will create two Action constants.
export const ALL_CHARACTERS = 'ALL_CHARACTERS'
export const SELECTED_CHARACTER = 'SELECTED_CHARACTER'
Create Action Creators and, why do we need them?
One thing we haven't talked much about yet is how we make things happen in Redux. We can dispatch an action directly in this way store.dispatch({type: 'SOME_ACTION'}), but frequently we want to dispatch something when the user clicks or an API request has been made, Ideally, we just want a function to call, right?
Action Creators It's just a plain old function that returns an action object. With this approach, we can repeat ourselves a bit less, and now we can dispatch like so:
export const all_characters = (characters) => (
      {
             type : ALL_CHARACTERS,
             payload : characters,
      }
)

export const selected_character = (character) => ({

       type : SELECTED_CHARACTER,
       payload : character,
})
Using action creators in our redux makes it simple now we don't have to remember the action constants to use structure the payload!
Creating Components
Now our app needs two components one to display all Rick and Morty characters and another one for displaying the details of selected characters.
In our src folder create a folder called components
How to Add a Call to the API.
Now that we know our app is capable of rendering the cartoon characters we receive from the API, we can add logic to make a request to get characters and render these on the screen.
Update your Display_Characters.js file with
import { useEffect } from "react";
import axios from "axios";

const Display_Characters = () => {

  //   Get api
  const display = async () => {
    const response = await axios
      .get("https://rickandmortyapi.com/api/character")
      .catch((err) => {
        console.log(err);
      });

    console.log(response.data.results);
  };

  useEffect(() => {
    display();
  }, []);


  return (
    <>
      <h2>Rick and Morty characters</h2>
    </>
  );
};

export default Display_Characters;
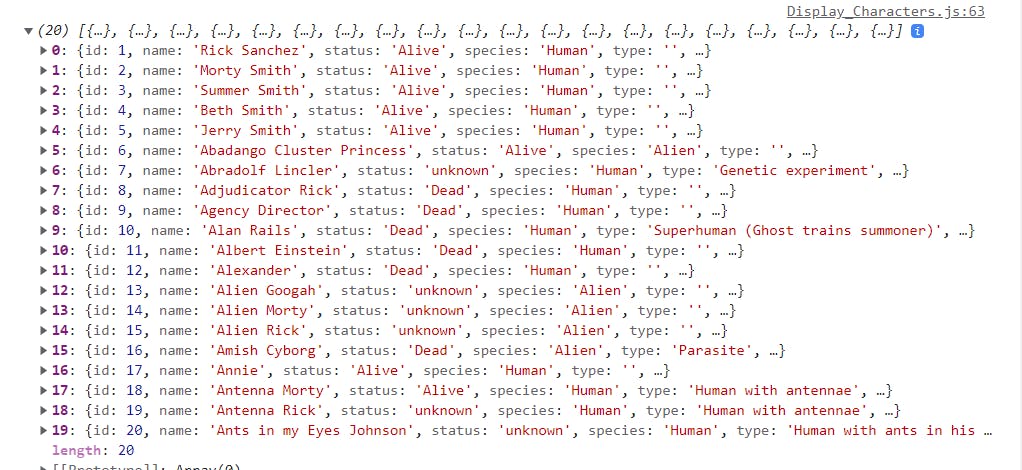
-In our component, we will make a call to the API to get the results.
We will call that function in the useEffect to load the results.
We can see the result of the API in our console.
How to pass the result of the API to the state and create the store.
Now at this point in time, we have to pass the result of the API to the state and what action we should perform so we need to create a reducer and initialize the state with the API results.
In our src folder create a subfolder- reducers
In our cartoon_reducer.js we will create a reducer for all characters
import { ALL_CHARACTERS} from "../../actions/Action";

const initialState = [];

export const Displayall_characters = (
  state = initialState,
  { type, payload }
) => {
  switch (type) {
    case ALL_CHARACTERS:
      return { ...state, characters: payload };

    default:
      return state;
  }
};
Now our initial state is an empty array, how can we pass the result of the API request to our initialState? And the answer is simple we just dispatch and action creator on the API result!
In our Display_Characters.js We can dispatch an action where we get the result of the API,
import { useEffect } from "react";
import axios from "axios";
import { useSelector } from "react-redux";
import { useDispatch } from "react-redux";
import { all_characters } from "../../redux/action_creators.js/Action_creator";
import { Link, useHistory } from "react-router-dom";
import { Displayall_characters } from "../../redux/reducers/cartoon_characters/Cartoon_reducer";
import "./cartoon.css";
const Display_Characters = () => {
  const cartoon = useSelector(
    (state) => state.Displayall_characters.characters
  );

  const dispatch = useDispatch();

  //   Get api
  const display = async () => {
    const response = await axios
      .get("https://rickandmortyapi.com/api/character")
      .catch((err) => {
        console.log(err);
      });

    console.log(response.data.results);
    dispatch(all_characters(response.data.results));
  };


  useEffect(() => {
    display();
  }, []);

  return (
    <>
      <h2>Rick and Morty characters</h2>
    </>
  );
};

export default Display_Characters;
- Our state gets all the values from the get API we are not able to see anything on our redux dev tools right now, for that we have to create a store to make redux up and working!
How to create a store and make redux dev tools working
In the src folder create a file store.js
Inside store.js, we will update the following-
import { combineReducers, createStore } from "redux"
import { devToolsEnhancer } from "redux-devtools-extension";
import { Displayall_characters } from "../redux/reducers/cartoon_characters/Cartoon_reducer";

const reducers = combineReducers({
     Displayall_characters,
});

const store = createStore(reducers , devToolsEnhancer(
));

export default store;
In the store.js when our app structure gets complex you'll want to split your reducing function into separate functions, each managing independent parts of the state.
The combineReducers helper function turns an object whose values are different reducing functions into a single reducing function you can pass to createStore().
-createStore() creates a Redux store that holds the complete state tree of your app. There should only be a single store in your app.
We created the store with the reducer !
Provide the redux store to React
Once the store is created, we can make it available to our React components by putting a React-Redux around our application in src/index.js. Import the Redux store we just created, put a around your , and pass the store as a prop:
import React from 'react';
import ReactDOM from 'react-dom';
import { Provider } from 'react-redux'
import './index.css';
import App from './App';
import reportWebVitals from './reportWebVitals';
import store from './store/store';
ReactDOM.render(
  <Provider store={store}>
   <App />
  </Provider>
,
  document.getElementById('root')
);
reportWebVitals();
Redux devtools in Action!
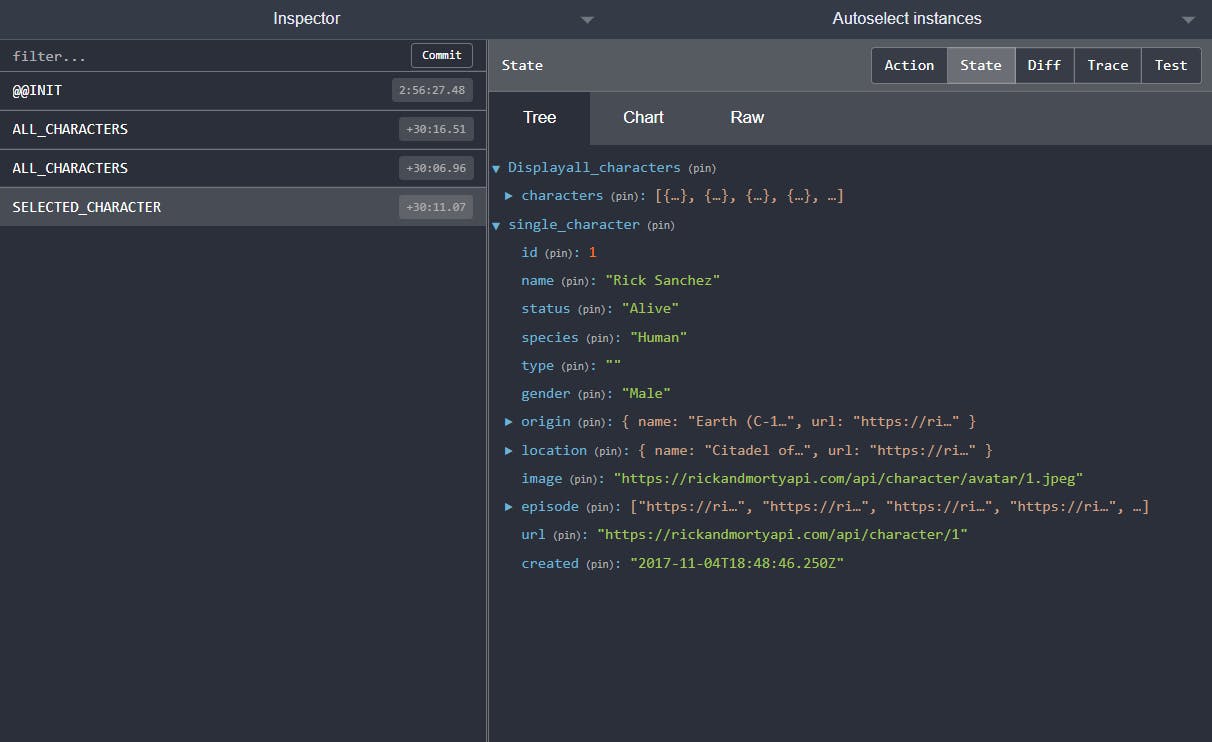
Now we have passed the store and created the reducer, now we can see our redux dev tools in action, In our state, we have the result of our API call!
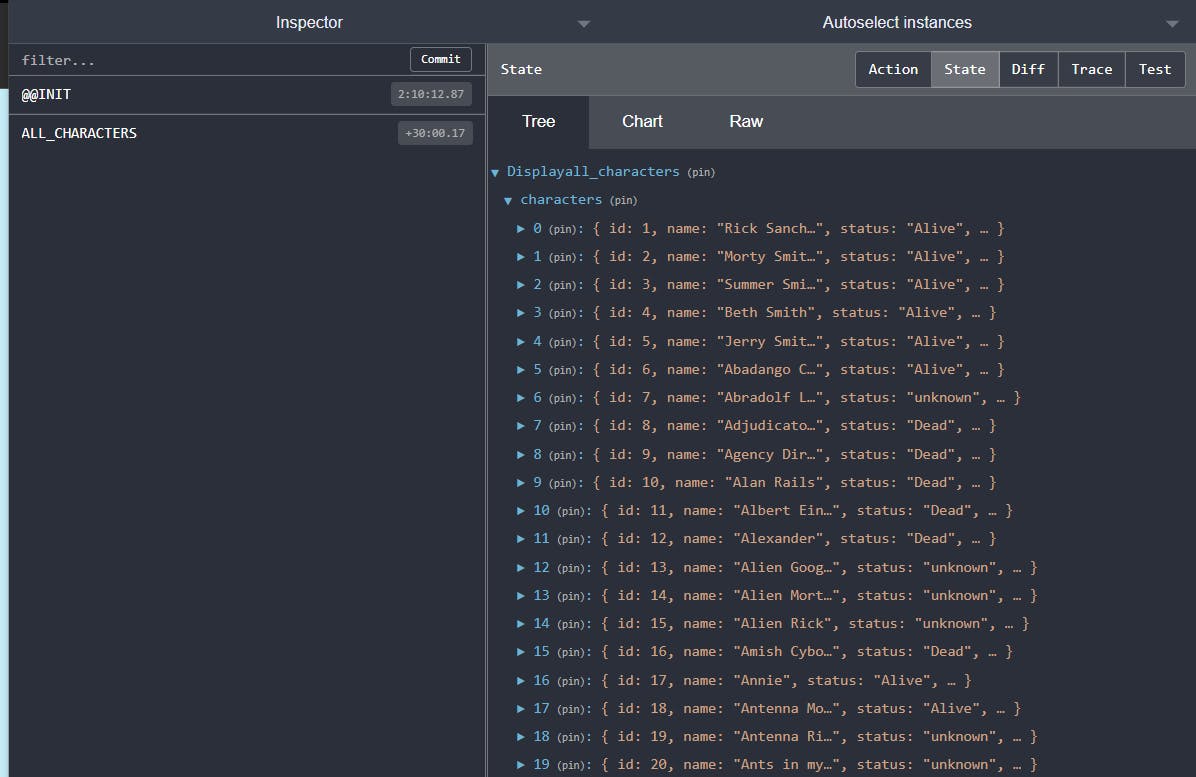
With this set we can now easily render the characters on our screen as we have all results saved in our state we can use the useselector() hook to get the state.
In our Display_Characters.js file
import { useEffect } from "react";
import axios from "axios";
import { useSelector } from "react-redux";
import { useDispatch } from "react-redux";
import { all_characters } from "../../redux/action_creators.js/Action_creator";
import { Link, useHistory } from "react-router-dom";
import { Displayall_characters } from "../../redux/reducers/cartoon_characters/Cartoon_reducer";
import "./cartoon.css";
const Display_Characters = () => {

  const cartoon = useSelector(
    (state) => state.Displayall_characters.characters
  );

  const dispatch = useDispatch();

  //   Get api
  const display = async () => {
    const response = await axios
      .get("https://rickandmortyapi.com/api/character")
      .catch((err) => {
        console.log(err);
      });

    console.log(response.data.results);
    await dispatch(all_characters(response.data.results));
  };

  useEffect(() => {
    display();
  }, []);

  console.log(cartoon, "cartoon");
  return (
    <>
      <h2>Rick and Morty characters</h2>

      {cartoon.map((character, idx) => {
        return (
          <div className="main" key={idx}>
            <Link to={`/character/${character.id}`}>
              <figure>
                <img src={character.image} alt="rick" />

                <div className="details">
                  <h4>Name : {character.name}</h4>
                  <span>Status : {character.status}</span>

                  <p> Check more </p>
                </div>
              </figure>
            </Link>
          </div>
        );
      })}
    </>
  );
};

export default Display_Characters;
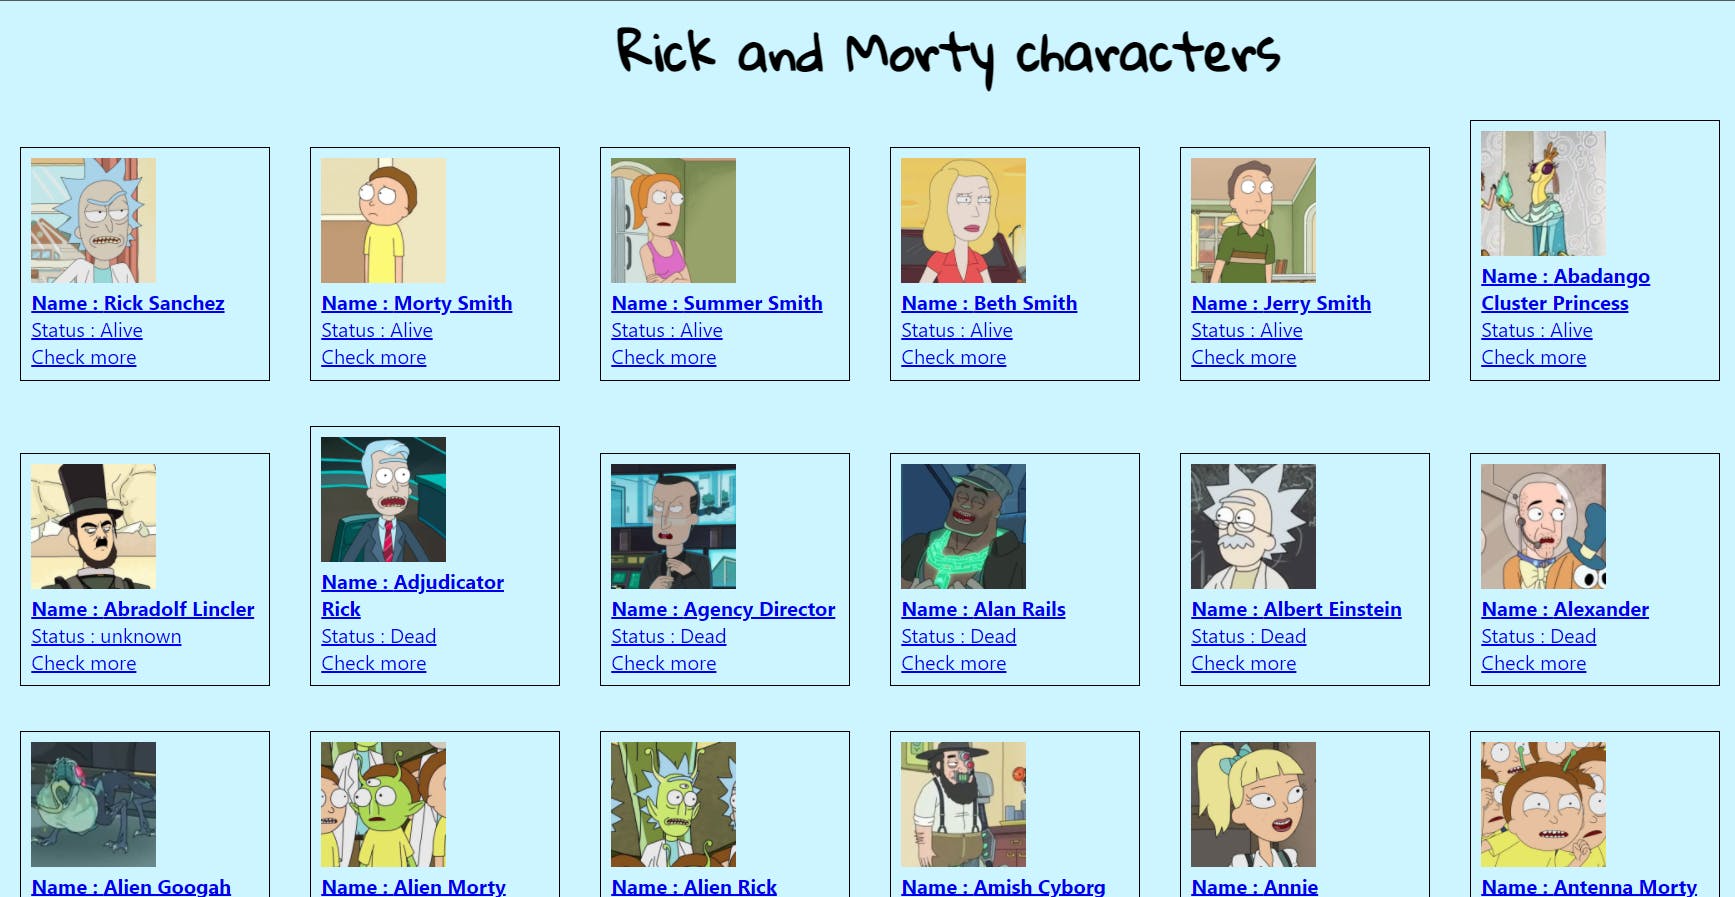
- We got the results from the state and now we can use the .map function to render the characters on the screen!
How to get the ID of a specific character
We can use the API 'rickandmortyapi.com/api/character/id' which takes the id as endpoint and display the single character details
To pass the id from Display_Characters to Selected_Character we have used from react-router-dom and link that to the Selected_Characters component. In our App.js we will declare routes for the components-
import "./App.css";
import {BrowserRouter as Router , Route , Routes} from 'react-router-dom'
import Selected_Characters from "./components/rick_morty_components/Selected_Character";
import Display_Characters from "./components/rick_morty_components/Display_Characters";

function App() {
  return (
    <div className="App">
      <Router>
      <Routes>
          <Route  path ='/' element={<Display_Characters/>} />
          <Route path='/character/:id' element={<Selected_Characters />} />
      </Routes>
   </Router>
    </div>
  );
}

export default App;
In our Display_Characters.js we can pass the id -
 {cartoon.map((character, idx) => {
        return (
          <div className="main" key={idx}>
            <Link to={`/character/${character.id}`}>
              <figure>
                <img src={character.image} alt="rick" />

                <div className="details">
                  <h4>Name : {character.name}</h4>
                  <span>Status : {character.status}</span>

                  <p> Check more </p>
                </div>
              </figure>
            </Link>
          </div>
        );
      })}
How to Display single character details
Now we have the id passed to the route to access the id we can make use of the useParams hook in react-router-dom to get ID.
const id = useParams();
console.log(id.id);
//1
We can make a reducer for displaying a single character with Action constant SELECTED_CHARACTER and an action creator-
export const selected_character = (character) => ({

       type : SELECTED_CHARACTER,
       payload : character,
})
Now we have the ID we can make a call to the API with the id as an endpoint, In our Selected_Character.js file
import { useEffect } from "react";
import { useParams } from "react-router";
import axios from 'axios'
import { useDispatch, useSelector } from "react-redux";
import { selected_character } from "../../redux/action_creators.js/Action_creator";


const Selected_Characters = () => {

    const selected = useSelector((state) => state);
    const dispatch = useDispatch();
    const id = useParams();
   const get_single = async() => {

        const response = await axios
        .get(`https://rickandmortyapi.com/api/character/${id.id}`)

        .catch((err) => {
          console.log(err);
        });

         console.log(response.data);
        dispatch(selected_character(response.data));

    }

    useEffect(() => {

         get_single()

    },[id]);

    return (
         <>

         <h2>character details</h2>
         <div className="main" >
       <figure>
          <img src={selected.single_character.image} alt="rick" />

          <div className="details">

                <h4>Name : {selected.single_character.name}</h4>
                <span>Status : {selected.single_character.status}</span>
         </div>
       </figure>
     </div>
      </>
    )
}

export default Selected_Characters;
we can pass the API result our state using dispatch we have to create a reducer for the same-
In our reducer.js file create another reducer for displaying a single character.
export const single_character = (state=initialState , {type , payload}) => {

          switch(type){
                case SELECTED_CHARACTER:

                     return {...state , ...payload}

                     default:
                 return state;
          }
}
we can follow the same step as above and pass this reducer to the store. Now when we click on the characters the id gets get passed to the API and our state gets updated with single character details.
You can see that in action in our redux dev tools-
The Final Touch
So far we have reached our goal!

But there is a problem associated with this when we select a character and go back and select again the previous character still remains the same for some time, this might be a leak as the state does not get cleared. Now I want you guys to create a reducer and action that clears the state give it a try maybe a hint will be -> using a cleanup function in the useEffect(), You can also use a loader until the details get fully loaded.
I hope you guys understood the concepts and try out the exercise mentioned at the end, Please like the post and comment out if I missed something.