Table of contents
No headings in the article.
Many of us including me when started to learn redux often get confused while creating a store and how to structure the redux app where to place all actions, reducers and how to set up a store. In this article, I will guide you on how to create a simple reducer and explain what store contains and the most interesting part of how to structure files and folders!
Are you learning redux but don't know how to set up a store and how to structure an app? You're not alone. I faced the same problem when I started learning redux. I would like to walk you guys through some redux tips by creating a simple reducer and store!
Topics I will cover in this article
- What is a reducer?
- What are actions and best practices to follow while writing actions.
- What are action creators?
- Creating a store.
- Methods associated with the store.
1. What is a reducer ? A reducer is a simple javascript function that takes the current state and actions as arguments and returns the value of the new state, basically, we can write a reducer like this const reducer = (state=initialstate , action) => new state so far we know what reducer does, simple it just returns a new state but it will not have any effect until we put that into a store.
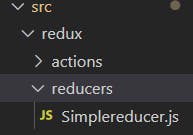
Folder structure for reducer In our redux app,
. In the ./src folder create a folder . /reducers create a SimpleReducer.js file in ./reducers

2. What are actions? And best practices to write actions
What comes to our mind when we think about the word action, the action simply means "Do something" Actions are simple javascript objects that contain a type field and they also contain a payload field to show extra data, I will cover that in action creators right now we will just create Actions constants
Let's say we want to increment something in our app, so the action for incrementing will be something like this ->
export const INCREMENT = 'INCREMENT';

export const ADD = 'ADD';
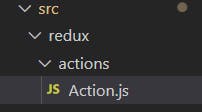
This is the best practice to write actions we can export these actions in our reducers. Create a folder ./actions In this create a file action.js in which all action constants will be there.

3. Action creators From the above example, we created two actions INCREMENT and ADD, now we can use actions directly but we can follow the best practice to write actions i.e action creators. Action creators are simply javascript functions that consist of type and payload of Actions here is an example of action creators for INCREMENT and ADD
export const increment = () => ({ type: INCREMENT });

export const add = (amount) => ({ type: ADD, payload: amount });
The main reason I create action creators is that you can easily make some changes to the action creator function, instead of searching for that action constant and making changes there.
4. Creating a reducer with action types
import { INCREMENT, ADD } from "../actions/Action";

export const increment = () => ({ type: INCREMENT });

export const add = (amount) => ({ type: ADD, payload: amount });

const initialState = {value : 0}
const Simplereducer = (state = initialState, action) => {
  if (action.type === INCREMENT) {
    const value = state.value + 1;

    return { value };
  }

  if (action.type === ADD) {
    const result = state.value + action.payload;

    return { result };
  } else {
    return state;
  }
};
In the above example, I have created a simple reducer that checks the type of action and returns a new state value, still, we have not reached the creating the store part so far we have created a reducer, action types, now let's move on to the final part that is store!
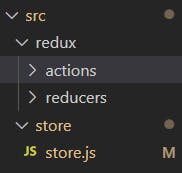
5. What is a store? The store is the root tree of ou redux application. So far we have created a reducer but we cannot update the state directly until we dispatch an action to the store. Folder structure of store

The store has 4 methods associated with it
Allows access to the current state via store.getState();
Allows state to be updated via store.dispatch(action);
Registers listener callbacks via store.subscribe(listener);
Handles unregistering of listeners via the unsubscribe function returned by store.subscribe(listener).
redux.js.org/tutorials/fundamentals/part-3-..
In our redux app, we have only a single store that consists of all reducers we do not have to create a separate store for reducers, we can do this with createStore method.
import { createStore } from "redux";
import Simplereducer, { increment } from "../redux/reducers/Simplereducer";

const store = createStore(
  Simplereducer
);

console.log(store.dispatch(increment()));

console.log(store.getState()); // {value : 2}
6. Adding the store to our main app So far we have created a store and can read the values associated with the store, we can make it available to our React components by putting a React-Redux around our application in src/index.js. Import the Redux store we just created, put an around your , and pass the store as a prop:
redux.js.org/tutorials/fundamentals/part-5-..
import React from 'react';
import ReactDOM from 'react-dom';
import { Provider } from 'react-redux'
import './index.css';
import App from './App';
import reportWebVitals from './reportWebVitals';

import store from './store/store';

ReactDOM.render(

    <Provider store={store}>
    <App />
    </Provider>,
  document.getElementById('root')
);
Thanks for reading! I do hope this article has been helpful to some degree for new tech bloggers. If you have any questions, feel free to comment below. Don't forget to like and share this article around if you think it might help a fellow blogger.