


In this blog, I will try to explain to you about local storage and how I used this in my react project let's dive into this interesting topic!!
What is Local storage?
Suppose you created a react app and want to store something on the app it can be anything like liked movies, selected channels or playlist and if you want them to appear anytime you open your app or refresh you can do all this stuff with local storage, it allows apps to save key-value pairs in web-browser without worrying about the expiration date. How Amazing!!!
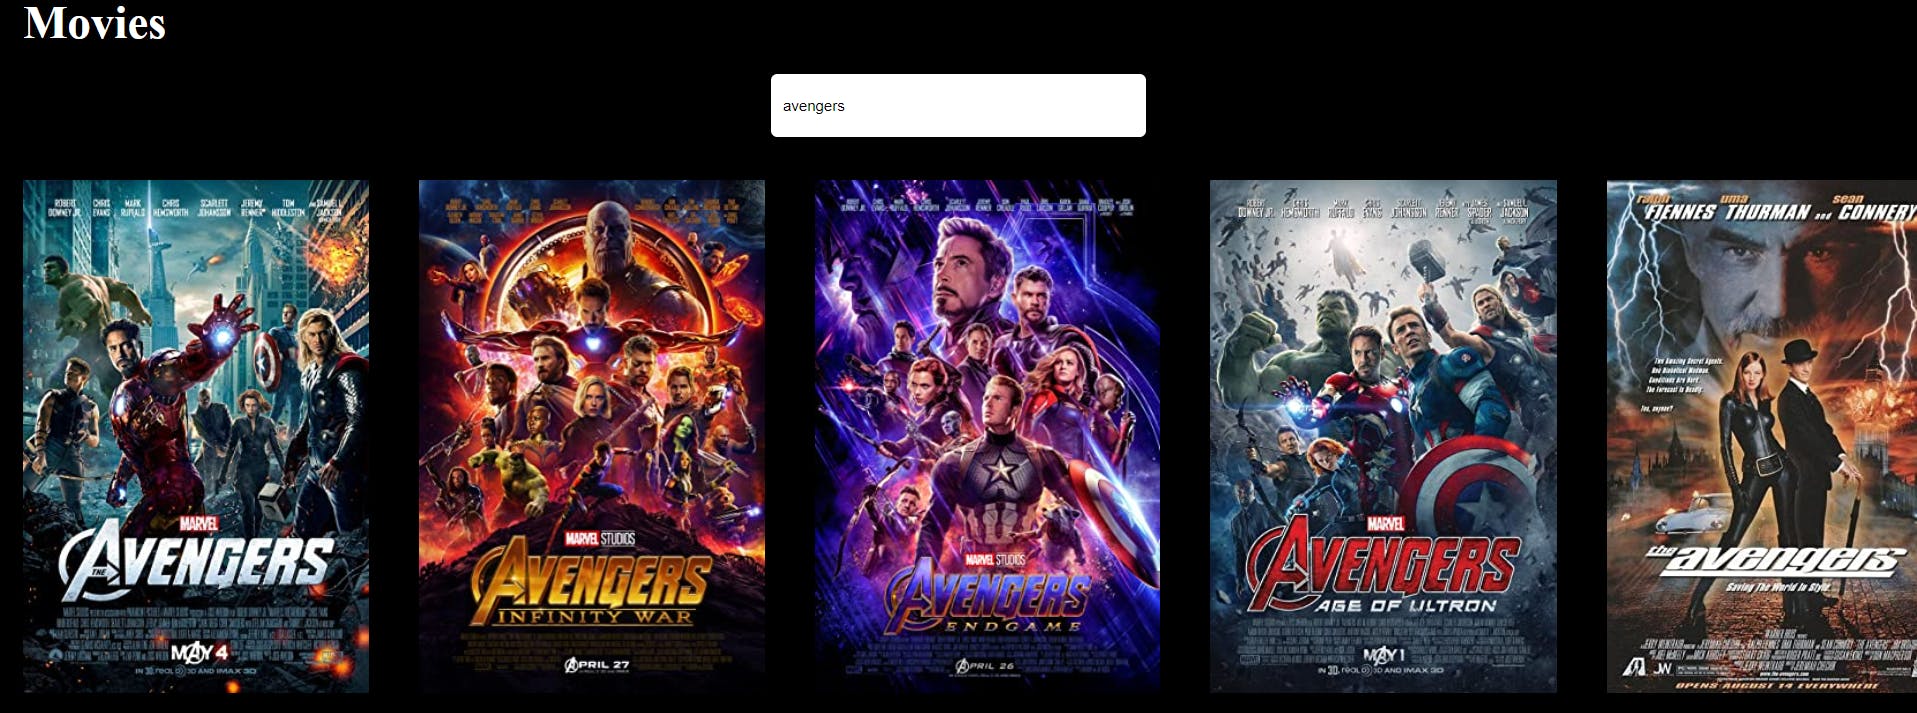
Here I have created a simple movie app that searches movies using API.
Now we don't want our project to display just the movies, I also wanted to add the selected movies to the Favourite collection so that everyone can see what my favourites movies are, There are just action movies in my favourites!!! Let's begin with creating the app,
1.First, we need to set the state for the movies In the app.js and call the API and render a component called MovieList which contains all our movies we will use this component for Favourites also.
function App() {
  const [movies, setmovies] = useState([]);
   async function fetchData(input) {
    const fetch_url = `https://www.omdbapi.com/?s=${input}&apikey=e86e479e`;
    const request = await fetch(fetch_url);
    const response = await request.json();
    if (response.Search) {
      setmovies(response.Search);
    }
  }

  useEffect(() => {
    fetchData();
  }, []);

  return (
   <MovieList movies={movies} />
   )
According to the response from API and calling that async function in useEffect hook, we are setting the movies, to run every time the app gets started.
2. Now we will create the MovieList component that takes movies as props and using the map method we render the list of movies present using data from API into an image tag.
function MovieList(props) {
return (

        {props.movies &&
          props.movies.map((movie) => (
            <div className="row__contains">
              <img
                className="row__image"
                key={movie.imdbID}
                src={movie.Poster}
                alt="title"
              ></img>
)
}
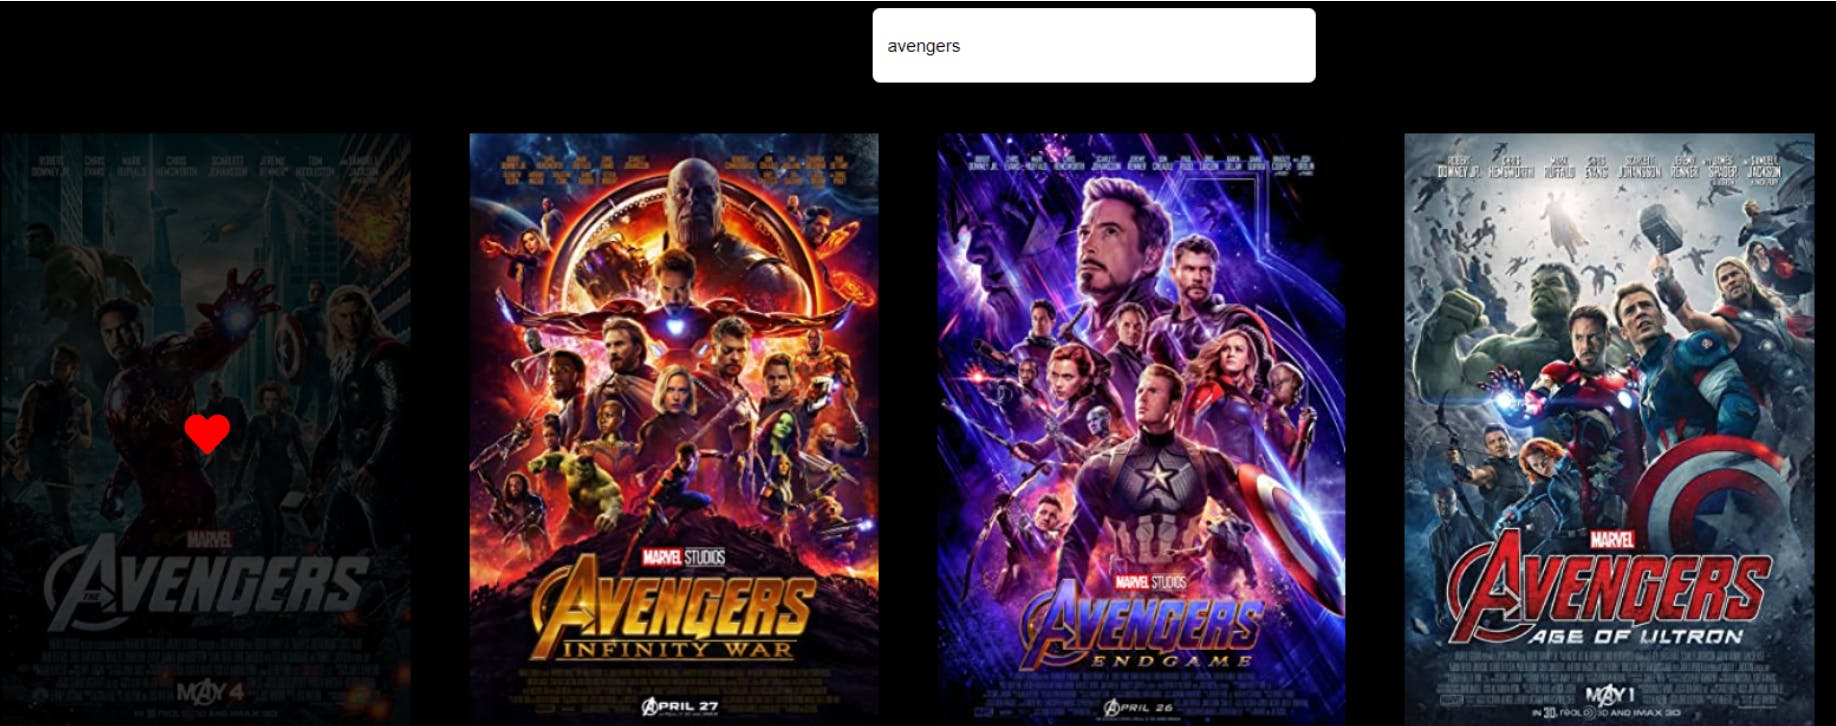
3. So far we got our movies displaying on the screen!!! Amazing right just apply a simple horizontal scroll effect. Now we want to add movies to the favourite List so for that we will create a component LikedMovies which contain the like icon or anything you can give for overlay effect.
function AddToFavourite() {
  return (
    <>
      <span className="text">
        <i class="fas fa-heart"></i>
      </span>
    </>
  );
}
Now, to display this icon on hover and add it to overlay we will import this in App.js and use this inside of our MovieList component.
import AddFavourites from "./components/AddFavourites";
function App() {
  const [movies, setovies] = useState([]);
  async function fetchData(input) {
    const fetch_url = `https://www.omdbapi.com/?s=${input}&apikey=e86e479e`;

    const request = await fetch(fetch_url);

    const response = await request.json();

    if (response.Search) {
      setovies(response.Search);
    }
  }

  useEffect(() => {
    fetchData(input);
  }, [input]);
return(
 <div className="movies__section">
        <MovieList
          movies={movies}
          favouriteComponent={AddFavourites}

        />
      </div>
)
Now in MovieList component, we pass the prop favourite component to variable FavouriteComponent and pass this variable as component in overlay.
function MovieList(props) {
  const FavouriteComponent = props.favouriteComponent;

  return (
    <div className="row">
      <div className="row__poster">
        {props.movies &&
          props.movies.map((movie) => (
            <div className="row__contains">
              <img
                className="row__image"
                key={movie.imdbID}
                src={movie.Poster}
                alt="title"
              ></img>

              <div
                className="row__overlay
              >
                <FavouriteComponent />
              </div>
            </div>
          ))}
        ;

  );
}
Here, we have added the imported AddFavourite component into the prop favouriteComponent inside the MovieList component It will render the component into the overlay, So far we get the overlay with a heart on hover, Bingo!!!
4.Now, we will set a state for the liked movies and add a function(addFavouriteMovie) to handleFavouriteMovies prop .
function App() {
  const [movies, setovies] = useState([]);
  const [favourite, setFavourite] = useState([]);

  async function fetchData(input) {
    const fetch_url = `https://www.omdbapi.com/?s=${input}&apikey=e86e479e`;

    const request = await fetch(fetch_url);

    const response = await request.json();

    if (response.Search) {
      setovies(response.Search);
    }
  }
  useEffect(() => {
    fetchData(input);
  }, [input]);
  return (
    <div className="App">
      <div className="movie__title">

      <div className="movies__section">
        <MovieList
          movies={movies}
          favouriteComponent={AddFavourites}
          handleFavouritesClick={addFavouriteMovie}
        />
      </div>
5.Now we will set our addFavouriteMovie function inside useEffect that gets called every time we click the movie and set the state with an array of favourite movies and the next movie which we clicked,
const addFavouriteMovie = (movieObj) => {
    // find if movie already there or not
    const isAlreadyFavourite = favourite.filter(
      (eachMovieObj) => eachMovieObj.imdbID === movieObj.imdbID
    );
    if (isAlreadyFavourite.length > 0) {
      // If already there do nothing
      return;
    }
    const newlikedmovies = [...favourite, movieObj];
    setFavourite(newlikedmovies);
6.Now, we have set the function and will pass it to the onClick event inside the MovieList component to actually click on the poster.
function MovieList(props) {
  const FavouriteComponent = props.favouriteComponent;

  return (
      <div className="row__poster">
        {props.movies &&
          props.movies.map((movie) => (
            <div className="row__contains">
              <img
                className="row__image"
                key={movie.imdbID}
                src={movie.Poster}
                alt="title"
              ></img>

              <div
                className="row__overlay"
                onClick={() => props.handleFavouritesClick(movie)}
              >
                <FavouriteComponent />
)
}
###7.Now to display the favourite movie we will copy the MovieList component as it and just change the movies prop to favourite which is the state that will actually display the movie you selected as a favourite.
 <div className="movies__section">
        <MovieList
          movies={favourite}
          handleFavouritesClick={RemoveFavouriteMovie}
        />
      </div>
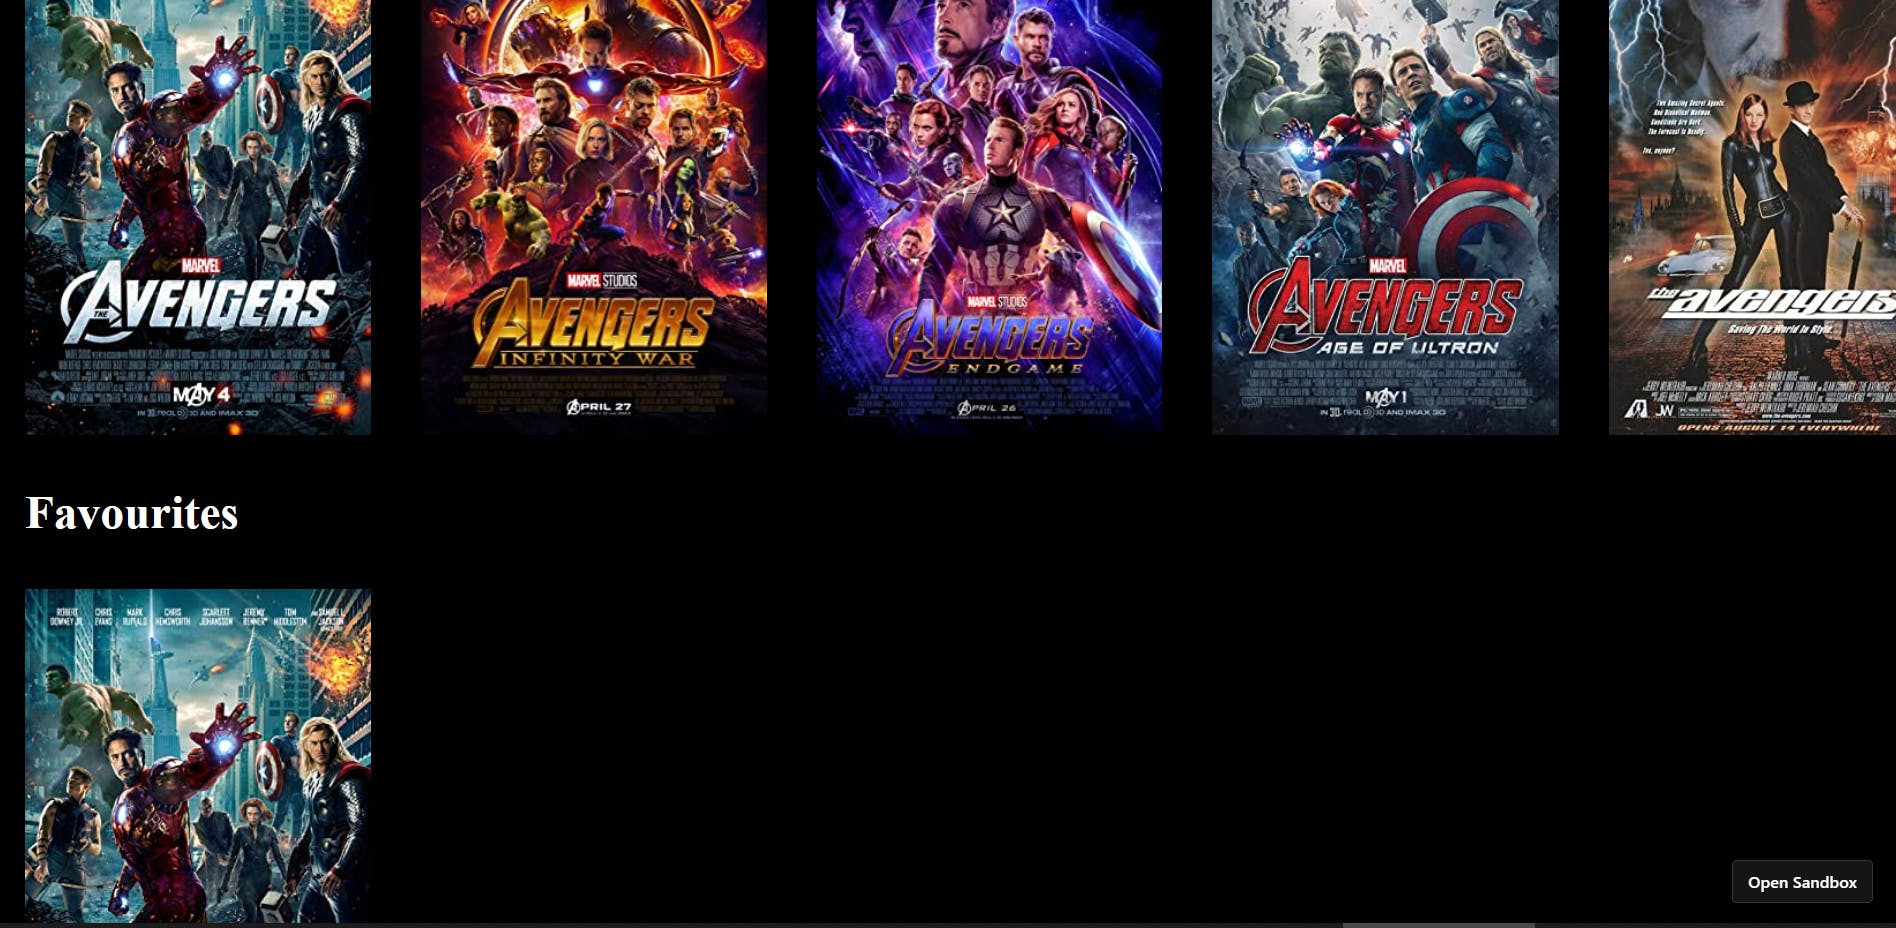
So far we are able to show the movies and add the selected movies to Favourites. But here is where our problem start. Just refresh the page and you will see that selected movies disappears!!!
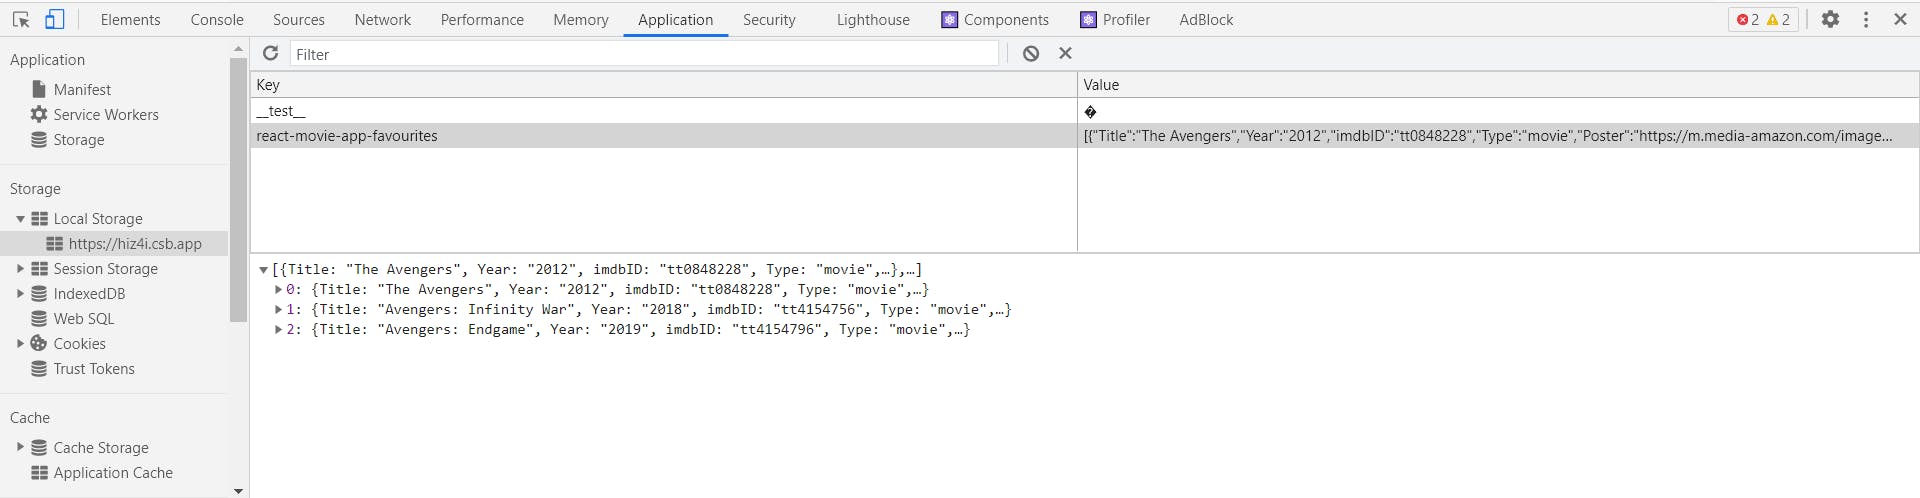
But don't worry we have a solution and here is the situation where we use local storage to set our favourite movies, we create a function Savetolocalstorage first, inside app.js
 const saveToLocalStorage = (items) => {
    localStorage.setItem("react-movie-app-favourites", JSON.stringify(items));
  };
**localStorage stores key-value pairs. So to store a entire javascript object we need to serialize it first (with JSON.stringify, for example):
localStorage.setItem('user', JSON.stringify(user));
Then to retrieve it from the store and convert to an object again:
var user = JSON.parse(localStorage.getItem('user')); **
###8.Lastly, we pass this saveToLocalStorage function inside the addTofavourite function it will work normally as before when click happens this function gets called and favourite movies will get added to local storage even if we refresh the app it still stays there, Amazing right!!!
const addFavouriteMovie = (movieObj) => {
    // find if movie already there or not
    const isAlreadyFavourite = favourite.filter(
      (eachMovieObj) => eachMovieObj.imdbID === movieObj.imdbID
    );
    if (isAlreadyFavourite.length > 0) {
      // If already there do nothing
      return;
    }
    const newlikedmovies = [...favourite, movieObj];

    setFavourite(newlikedmovies);
    saveToLocalStorage(newlikedmovies);
  };
We can see the favourite movies added to our local storage, How cool!
This is all guys, try to implement this concept in your next app and you can see the code and refer if you got stuck GitHub:- github.com/Abhay5855/Movies-fun-app